 Pin it
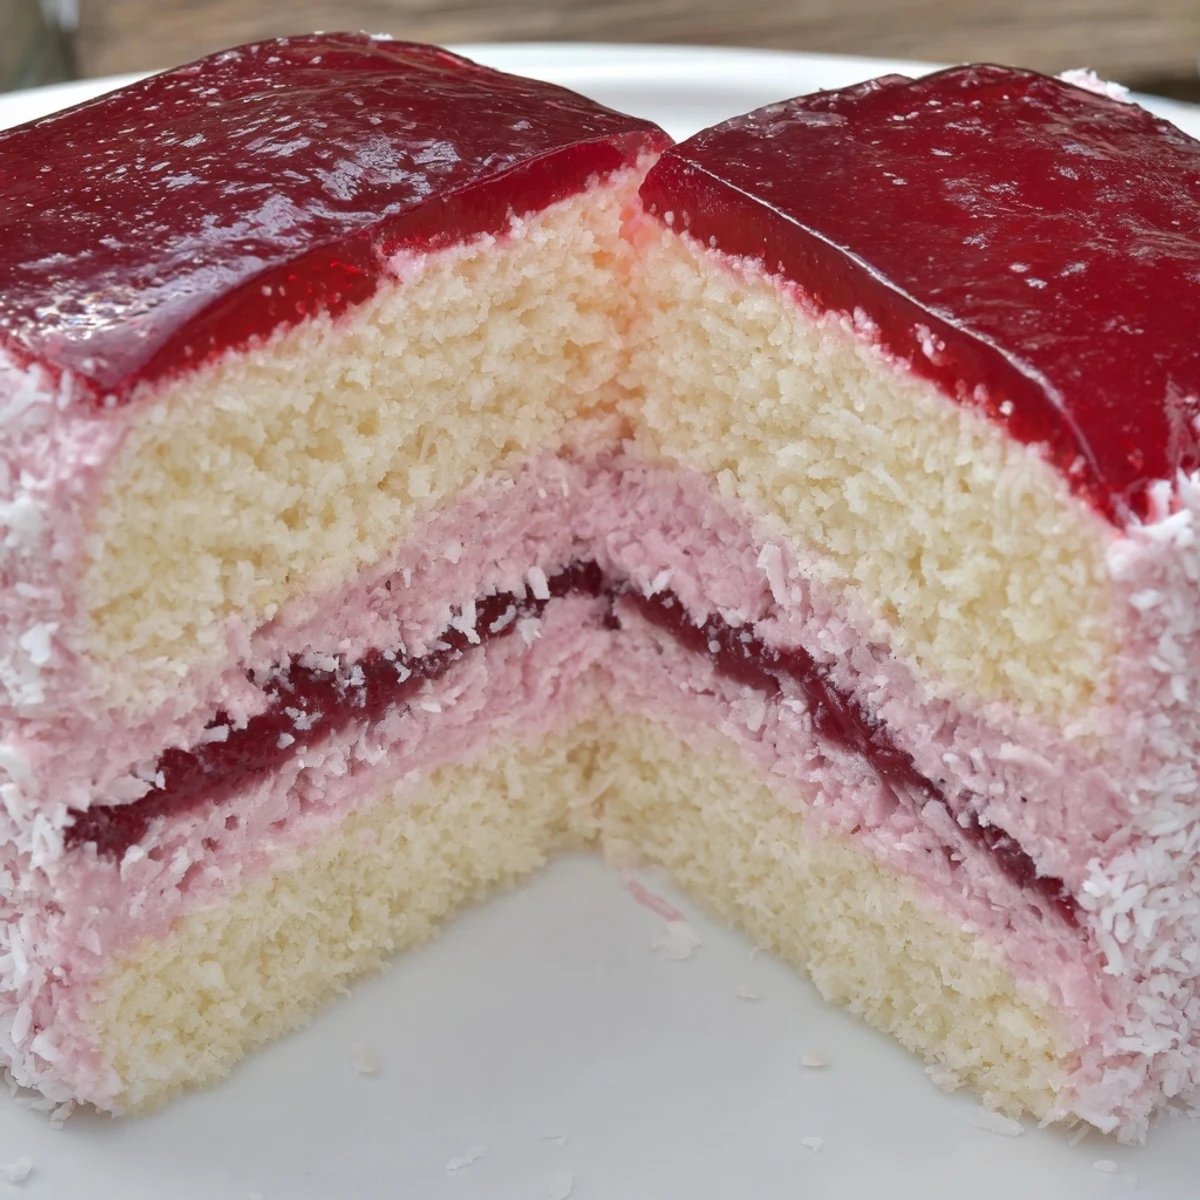
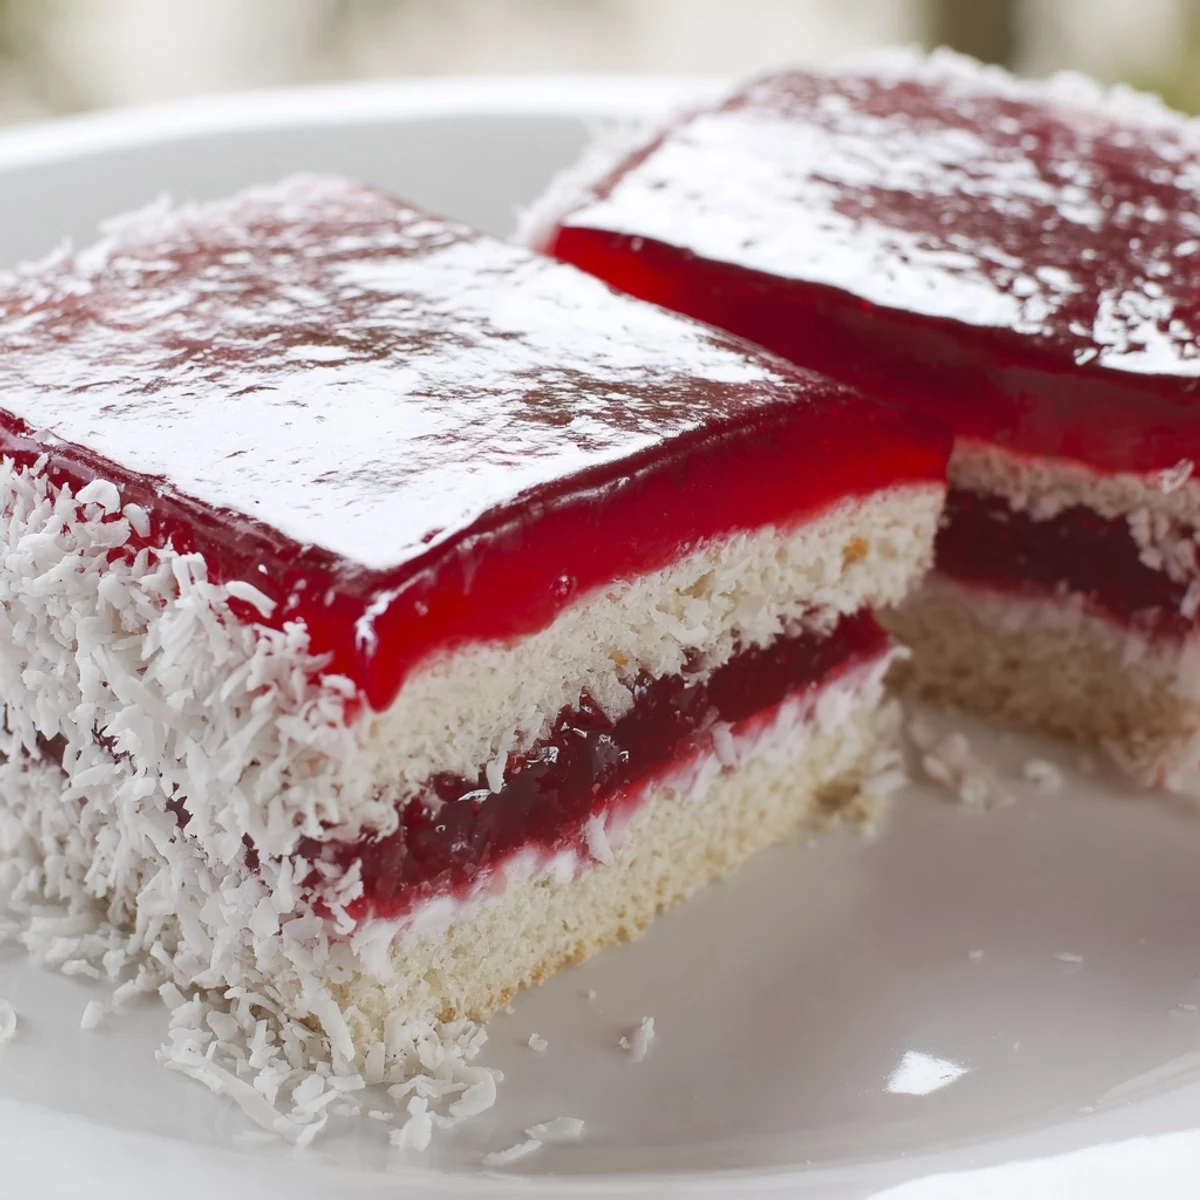
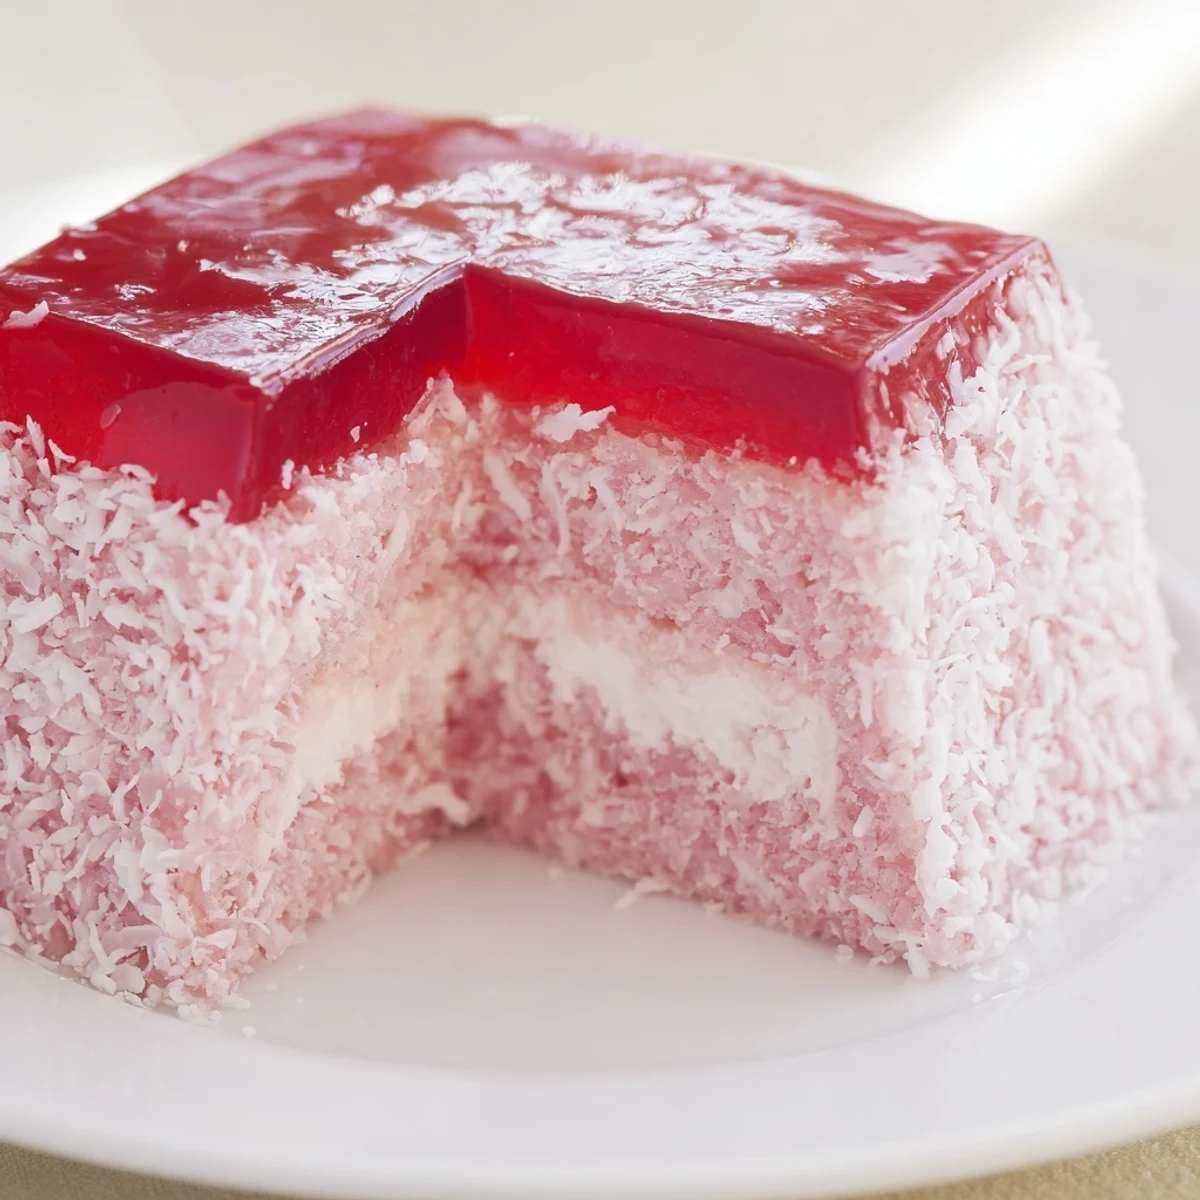
 These old-fashioned pink jelly cakes start with a light Australian sponge baked in a sheet, cooled and cut into squares. Whipped thickened cream is sandwiched between two sponge pieces; each assembled cake is dipped into semi-set raspberry jelly so it adheres evenly, then rolled in desiccated coconut. Chill at least 30 minutes to set. Time the jelly carefully and use a shallow dish for quick, even coating; try passionfruit or coconut cream to vary the flavour.
My nan used to keep a tin of pink jelly cakes on the kitchen counter every Saturday, and my sister and I would race to see who could grab the last one before afternoon tea even started. They were always slightly uneven, one corner thicker with coconut than the rest, and I think that is what made them perfect. Something about the way the jelly soaked into the sponge just slightly at the edges made them feel like nothing else from the bakery ever could.
I made a batch for a friend's birthday picnic last spring and forgot to chill the jelly long enough, so half the cakes ended up looking like beautiful pink puddles on the tray. We ate them with spoons straight from the plate and honestly they were still incredible.
Ingredients
- Unsalted butter (125 g, softened): Room temperature butter is the foundation of a light sponge, so pull it out an hour before you start.
- Caster sugar (125 g): Finer than regular sugar, it creams into the butter smoothly without leaving gritty pockets.
- Large eggs (2): They give structure and richness, and adding them one at a time keeps the batter from curdling.
- Vanilla extract (1 tsp): A warm background note that ties the butter and eggs together beautifully.
- Self-raising flour (180 g, sifted): Sifting is not optional here because it aerates the flour and gives you that tender crumb.
- Milk (100 ml): Just enough to loosen the batter to a dropping consistency without making it heavy.
- Raspberry or strawberry jelly crystals (85 g packet): The signature pink coating that makes these cakes instantly recognizable.
- Boiling water (250 ml) and cold water (150 ml): Used to dissolve and cool the jelly to the perfect semi set stage.
- Thickened cream (200 ml): Whipped to firm peaks, it becomes the soft center holding each little sandwich together.
- Icing sugar (1 tbsp) and vanilla extract (1/2 tsp): Lightly sweeten and perfume the cream without overpowering it.
- Desiccated coconut (100 g): The final coating that adds texture and that classic bakery window look.
Instructions
- Get the oven ready:
- Preheat to 180 degrees Celsius (350 degrees Fahrenheit), then grease and line a 20cm by 30cm baking tin with parchment paper so nothing sticks.
- Build the sponge batter:
- Cream the butter and caster sugar until the mixture looks pale and cloud like, then beat in the eggs one at a time followed by the vanilla.
- Fold and pour:
- Alternately fold in the sifted flour and milk, stopping as soon as everything is just combined so you do not knock the air out.
- Bake and cool:
- Spread the batter evenly into the tin and bake for 12 to 15 minutes until a skewer inserted in the center comes out clean, then cool in the tin for 10 minutes before turning onto a wire rack.
- Prep the jelly:
- Dissolve the jelly crystals in boiling water, stir in the cold water, pour into a shallow dish, and refrigerate for 45 to 60 minutes until it is just beginning to set but still liquid enough to coat.
- Cut and fill:
- Cut the cooled sponge into 24 equal squares, whip the cream with icing sugar and vanilla to firm peaks, and sandwich pairs of sponge together with a generous spoonful.
- Dip and roll:
- Dip each sandwiched cake quickly into the semi set jelly, letting the excess drip off, then roll immediately in desiccated coconut and place on a wire rack to set for 30 minutes in the fridge.
 Pin it
 There is something about handing someone a plate of these little pink cakes that makes them smile before they even take a bite. They carry the feeling of a slower afternoon, a folded tablecloth, and a kettle whistling in the next room.
Getting the Jelly Consistency Right
This is the one part that can feel tricky the first time. You want the jelly thick enough to cling to the sponge but loose enough that it coats evenly without dragging. If you pull it too early, it runs straight off and leaves patchy spots. If you wait too long, you end up with a thick gel that refuses to spread. Somewhere around the 50 minute mark in the fridge is usually the sweet spot, and a gentle stir will tell you everything you need to know about the texture.
Swapping Flavors and Making It Your Own
Raspberry is the classic choice and the one most people remember from childhood, but strawberry works beautifully too if you want something a little sweeter. I once tried passionfruit jelly on a whim and the tartness was a wonderful surprise against the creamy filling. Orange jelly gives a more subtle perfume that pairs especially well if you add a teaspoon of orange zest to the sponge batter.
Serving and Storing Your Jelly Cakes
These are at their absolute best on the day they are made, when the sponge is still soft and the jelly has not had time to seep too far in. If you need to store them overnight, keep them in a single layer in an airtight container in the fridge.
- Let them sit at room temperature for about ten minutes before serving so the cold does not mute the flavors.
- Avoid stacking them because the coconut coating will stick and pull away from the cake below.
- If you are making them for a gathering, prepare the sponge the day before and do the jelly dipping the morning of for the freshest result.
 Pin it
 Every time I make these I think of my nan and that slightly dented tin on her kitchen counter. Some recipes are just food, but these are a feeling worth holding onto.
Recipe Questions & Answers
- → How do I know when the jelly is ready for dipping?
-
The jelly should be slightly gelled but still pourable — thick enough to coat without running off. Refrigerate in a shallow dish and check after 45–60 minutes; when a spoon leaves a defined trail it’s ready for dipping.
- → How can I prevent the sponge from becoming soggy?
-
Cool the sheet sponge completely before cutting and assembling. Use whipped cream at firm peaks and dip briefly while the jelly is semi-set so it clings rather than soaks in. Work quickly and chill finished pieces promptly.
- → Are there flavour variations that work well?
-
Yes — passionfruit, orange or strawberry gels create bright alternatives. You can also fold a little citrus zest into the sponge or cream to balance sweetness and add freshness.
- → What are good dairy-free swaps?
-
Replace thickened cream with whipped coconut cream and use plant-based milk and a dairy-free spread in the sponge. Ensure the coconut cream is well chilled so it whips to firm peaks.
- → How should I store these and how long do they keep?
-
Store finished cakes in the fridge, loosely covered, and consume within 24 hours for best texture. Coconut coating may absorb moisture over time, so they’re at their best the day they’re made.
- → Any tips for neat coating and rolling in coconut?
-
Use a shallow dish for jelly and a second tray for coconut. Dip with tongs or fingers, let excess drip briefly, then roll immediately in coconut. A wire rack helps excess jelly drip away and ensures an even finish.